Setting Up the Built-in Licensing System - WebExeBuilder Type
This guide walks you through configuring the built-in license key system for your WebExeBuilder project. This system generates and validates license keys locally — no internet or third-party service required.
What You Need
- Your app project open in WebExeBuilder Builder
- A plan for how you want to distribute license keys to customers
Step 1: Enable Restricted Mode
On the Security tab, check "Create a restricted application". Without this, your app runs freely with no licensing.
Step 2: Select Built-in License System
Under License Provider, select Built-in License System (this is the default).
Step 3: Configure the Default Package
Every project starts with two packages: Default Package and Restricted Package. The Default Package controls what happens before a user registers and cannot be renamed or removed. The Restricted package can be renamed if you wish.
Select the Default Package and configure:
| Setting | What It Does |
|---|---|
| Expire | Enable to limit trial usage by days or runs |
| Expire After | Number of days or runs before the trial ends |
| Expire Type | Choose "Days" (calendar time) or "Runs" (launch count) |
| Nag Screen | When to show the nag/registration screen: Always, On Expire, or Never |
| Nag Delay | Seconds the user must wait before they can click Continue |
| Increase delay by usage | Enable to progressively increase delay, the Nag Delay becomes final/maximum delay |
| No Trial Access | If checked, users cannot continue without registering — the app requires a valid key |
| Rollback | If checked, expired registered packages fall back to the Default Package trial |
| Expire Message | Custom message shown when the trial expires (leave blank for default) |
| Purchase URL | Link to your purchase page, shown on the nag screen |
Step 4: Create Additional Packages (Optional)
Packages let you offer different license tiers. Click Add Package to create one.
Each package gets its own Package Key (auto-generated). This key is used during license key generation to tie a key to a specific package.
Example setup:
| Package | Expire | Days/Runs | Nag | Rollback | Use Case |
|---|---|---|---|---|---|
| Default Package | Yes | 30 days | Always | — | Free trial |
| Personal | No | — | Never | Yes | Paid personal license |
| Business | No | — | Never | Yes | Paid business license |
| Subscription | Yes | 365 days | On Expire | Yes | Annual subscription |
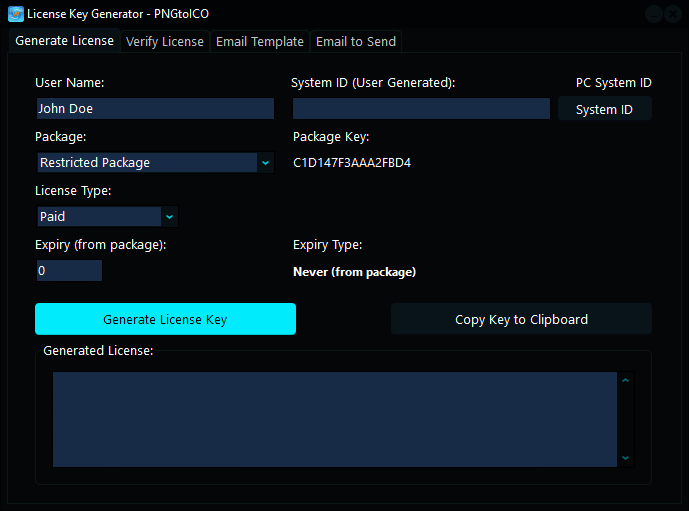
Step 5: Generate License Keys
Click the License Key Generator button (or use the Tools menu) to open the key generation form.
For each customer, fill in:
| Field | What to Enter |
|---|---|
| User Name | The customer's name (must match exactly when they register) |
| Package | Select which package/tier this key unlocks |
| License Type | Free, Trial, Paid, Business, Donation, etc. |
| Expiry Days | Set to 0 for no expiry, or a number for time-limited keys |
| System ID | Leave blank for a floating key (works on any machine), or paste a System ID for hardware-locked keys |
Click Generate to create the key. Copy it and send it to your customer.
Floating vs. Hardware-Locked Keys
- Floating keys (System ID left blank): Work on any computer. The customer can use the same key on different machines.
- Hardware-locked keys (System ID filled in): Only work on the specific machine that generated that System ID. The customer needs to provide their System ID from the nag screen, and you paste it into the generator.
To show the System ID on the nag screen, check "Use System ID (hardware locked keys)" in the Security settings.
How It Works at Runtime
App starts
  │
  ├─ Is the app restricted?
  │   └─ No → App runs freely
  │
  ├─ Load saved registration data (if any)
  │
  ├─ Is the user registered?
  │   ├─ Yes → Validate stored key against package
  │   │         ├─ Valid → Check if package is expired
  │   │         │           ├─ Not expired → Run normally
  │   │         │           └─ Expired → Rollback or show expire message
  │   │         └─ Invalid → Clear registration, show nag
  │   │
  │   └─ No → Check Default Package settings
  │             ├─ No Trial Access? → Must register to continue
  │             └─ Trial allowed → Show nag based on Nag setting
  │
  └─ User enters Name + License Key
      └─ Key validated against all project packages
          ├─ Match found → Activate that package, save registration
          └─ No match → Show error
Trial Expiration
When a trial expires (days elapsed or runs exhausted):
- The Expire Message is shown on the nag screen
- If Rollback is enabled on the registered package, the user falls back to the Default Package
- If No Trial Access is enabled on the Default Package, the user cannot continue without a valid key
- The Purchase URL is displayed so the user can buy a license
Nag Screen Behavior
| Nag Setting | When Nag Screen Appears |
|---|---|
| Always (0) | Every time the app launches |
| On Expire (1) | Only after the trial has expired |
| Never (2) | Never shown (user must access registration from the menu) |
The nag screen shows:
- App title and branding
- Trial status (days/runs remaining, or expired)
- System ID (if hardware locking is enabled)
- Register button to enter a license key
- Continue button (with countdown delay) or Exit button if expired
Key Reuse Protection
The built-in system tracks used keys per machine. If a customer tries to re-register with a key that was already used and exhausted on the same machine, it will be rejected. This prevents reusing expired run-limited keys.
Quick Checklist
- Restricted mode enabled
- Built-in License System selected
- Default Package configured (expire type, days/runs, nag behavior)
- Additional packages created for your license tiers (if needed)
- Package Keys generated for each package (auto-generated)
- License keys generated for customers using the Key Generator
- Hardware locking configured (if desired)
- Purchase URL set on packages for the nag screen
- Expire messages customized (or left as default)