Getting Started with WebExeBuilder
Welcome to WebExeBuilder — the tool that turns your web app into a standalone Windows executable. This guide will walk you through creating your first project, from start to compiled .exe.
What is WebExeBuilder?
WebExeBuilder takes your HTML, CSS, and JavaScript files and packages them into a single Windows .exe file. Your users run it like any desktop app — no browser, no web server, no installation required.
Under the hood, the app uses Microsoft WebView2 (Chromium) to render your web content, so everything you build for the web works here too.
Before You Start
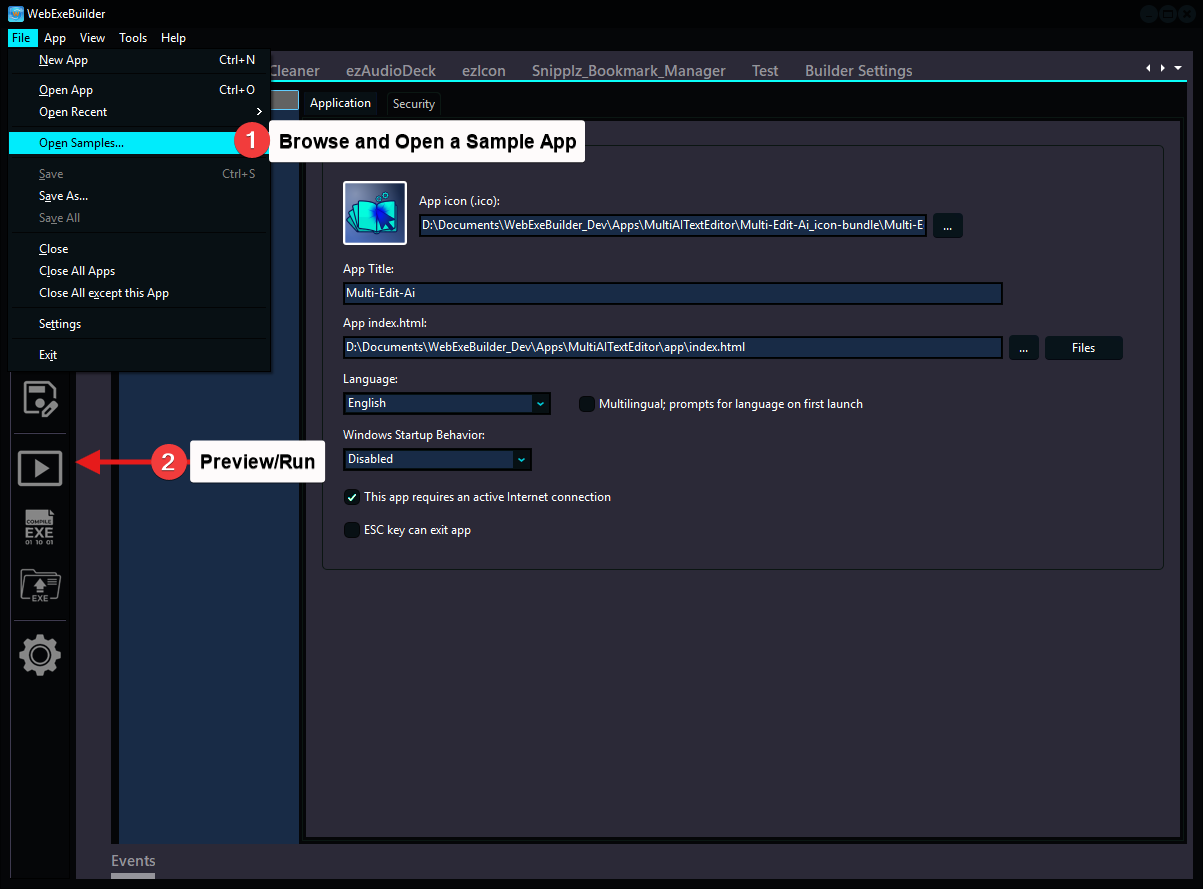
Try the sample applications
Step 1: Open a sample app using the File/Open Samples... menu selection
Step 2: Then click on the Preview/Run button to see them in action.
Before You Create a new App
Make sure you have:
- A folder with your web project files (at minimum, an
index.html) - WebExeBuilder Builder installed and running
- Windows 10 or later
Project/
│
├── app/
│   └── index.html      ← Your main HTML file in app folder
└── Project.web         ← Save WebExeBuilder project file here
Step 1: Create a New Project
- Open WebExeBuilder Builder
- First run, the new project dialog will open default or Go to File → New (or click the New button on the toolbar)
- Enter a Project Name — this becomes your app's title
- Click Browse and select your main HTML file (usually
index.html) - Click OK
The Builder file manager will open with the files located inside the project folders, you can adjust file properties here as needed. Then save your app.web project file in the parent folder of your HTML file. This file stores all your project settings. In this manner, when compiling your project, the compiled executables and project file are not included inside the file manager files. You don't want to include your app.web or app.exe inside the file manager files.
Project File Structure
After creating a project, your folder looks like this:
Project/
├── app/
│   ├── index.html        ← Your main HTML file
│   ├── css/              ← Your stylesheets
│   │   └── style.css
│   ├── js/               ← Your JavaScript
│   │   └── helper.js
├── images/
│   └── logo.png          ← Your assets
│
├── Project.web           ← WebExeBuilder project file (auto-created)
├── Project_x32.exe       ← Compiled 32-bit app (after compile)
├── Project_x64.exe       ← Compiled 64-bit app (after compile)
└── README.txt
The .web file is a JSON file that stores all your project settings. You can version control it alongside your web files.
Step 2: Configure Your App
After creating the project, the App Options panel and the File Manager panel both open automatically. The File Manager shows your web project's files, and the App Options panel is where you configure everything. Here's a quick tour of the tabs:
Application Tab
Set your app's identity:
- App Title — the name shown in the title bar and taskbar
- Version — your app's version number
- App Icon — pick a
.icofile for your app's icon or nothing for default - Language — choose the default UI language
- Multilingual — allow Multilingual app; prompts for language on first launch.
- Internet — Does your app requires Internet.
- Windows Startup Behavior — How your app can start when Windows starts.
- Can use ESC key to exit app — Users can press escape key (ESC) to exit app.
Window Tab
Control how your app's window looks and behaves:
- Width / Height — starting window size in pixels
- Window Title — what appears in the title bar
- Resizable — let users resize the window
- Frameless — remove the standard Windows title bar for a custom look
- Full Screen — launch in full screen mode
- Always on Top — keep the window above other apps
- Center Window — start centered on screen
- Save User Position — remember where the user moved the window
- Tray Icon — add a system tray icon
- Minimize to Tray on Close — close button sends to tray instead of exiting
- VCL Style — pick a visual theme for the window chrome and controls
Browser Tab
Fine-tune the embedded browser:
- Auto Play — allow media autoplay
- Context Menu — choose what right-click menu to show (default, custom, or none)
- Developer Console — enable DevTools for debugging (disable for production)
- Clear Cache — clear browser cache on each launch
- User Agent — set a custom user agent string
- Color Scheme — force light, dark, or auto mode
- Zoom Factor — set the default page zoom level
- Browser Arguments — pass custom Chromium command-line flags
JavaScript Tab
Inject custom JavaScript at three stages of page loading:
- Before HTML — runs before the page starts parsing
- DOM Loaded — runs when the DOM is ready (before images load)
- End of Body — runs after the page is fully loaded
This is useful for adding analytics, modifying the DOM, or initializing your app's native bridge.
About Tab
Customize the built-in About dialog:
- Company name, author, copyright, website, email
- Background image, brand logo, and "Buy Now" button
- Version display and style options
Note If you are not creating a restricted mode app, many of the about screen options are not used and the about form is much smaller.
Security Tab
Enable licensing and registration (optional):
- Restricted Mode — turns on the licensing system
- License Provider — choose Built-in or Gumroad
- Package Settings — configure trial limits, nag screens, and license tiers
See the Built-in Licensing Guide or Gumroad Setup Guide for details.
Compiler Tab
Platform targets and build notes:
- Win32 / Win64 — choose which platforms to compile for
- One Instance — prevent multiple copies of your app from running
- Notes, Changelog, ReadMe, and License text fields for your records
Step 3: Manage Your Files
Click the File Manager panel (or go to View → File Manager) to see and manage the files that will be embedded in your executable.
The File Manager shows your web project folder. All files in this folder get bundled into the final .exe as a Virtual File System (VFS). At runtime, your app loads pages and assets directly from this embedded archive — no external files needed. If you add or remove files from disk, you need to add them or remove them inside the file manager or use the re-scan menu option. After this you may need to adjust file properties, encryption options etc.
Step 4: Compile Your App
- Click the Compile button on the toolbar (or go to App → Compile)
- The Builder packages your web files into a ZIP archive, embeds it into the stub executable, applies your icon and version info, and outputs the final .exe
- Check the Events panel for build progress and any errors
- Your compiled app appears in the same folder as your project file
The output files follow this pattern:
YourAppName_x32.exe— 32-bit versionYourAppName_x64.exe— 64-bit version
Step 5: Run and Test
Click the Run button on the toolbar to launch your compiled app directly from the Builder. Or just double-click the .exe in Explorer.
Your web app is now a standalone Windows application.
Using the JavaScript Bridge API
WebExeBuilder apps have access to a powerful JavaScript API through the web namespace. This gives your web code native desktop capabilities:
// Read and write files
await web.files.writeTextFile({ filePath: 'C:\\data\\config.json', contents: '{}' });
const data = await web.files.readTextFile({ filePath: 'C:\\data\\config.json' });

// Show native dialogs
const file = await web.dialogs.openFile({ title: 'Select a file' });

// Control the window
await web.window.setSize({ width: 1024, height: 768 });
await web.app.enterFullScreen();

// Store persistent variables
await web.variables.setVar({ key: 'theme', value: 'dark' });
const theme = await web.variables.getVar({ key: 'theme' });

// Check license status
const licensed = await web.app.licensed();
const trial = await web.app.trialInfo();
See the Application Development Guide for the full API reference with all 90+ commands across 12 categories.
Tips for New Users
- Start simple — get a basic HTML page compiling and running before adding complexity
- Samples — look at the sample projects and code, there's nothing better than working examples
- Use DevTools — enable the Developer Console in Browser settings during development, disable it for production
- Test both platforms — if you're targeting Win32 and Win64, test both builds
- Save often — use Ctrl+S or the Save button to save your project settings
- Check the Events panel — build errors and warnings appear here
- Use VCL Styles — they give your app a polished, professional look with one click
- Explore the API — the JavaScript bridge is what makes WebExeBuilder apps powerful; browse the API docs to see what's possible
Next Steps
- Application Development Guide — full JavaScript API reference and architecture patterns
- Built-in Licensing Setup — add trial limits and license key protection
- Gumroad License Setup — connect to Gumroad for online license verification